Are you struggling to create a WordPress menu and want to know how to add menu in WordPress and couldn’t find any valuable resources? In this tutorial, we will show you how to add a WordPress menu to your website step-by-step while discussing 3 simple ways to go forward.
You can add the menus of your choice no matter if you are running a Corporate website, an E-Commerce blog, an online magazine, or even a personal site that just shows off your pictures. You have total creative freedom with WordPress. After all, this is the best CMS that exists today.
Aside from being easy to use, WordPress is a very powerful tool. The possibilities are endless, you can do almost anything on it. While having numerous options to choose from can be great for some, it can also be overwhelming. However, one of the easiest ways to spice up your website is with custom menus.
If you’re short on time or have no experience creating WordPress menus, plugins can be an easy way to give your site a professional look. Many options exist to help you create the perfect menu, and this article has been designed to help you decide which one is best for you
The key to creating effective menu systems is to organize them in a visual, hierarchical way that clearly illustrates the structure of your website while allowing you to easily add and remove pages. Before diving in and learning how to create custom menu in WordPress we will learn more about WordPress Navigation Menu.
What is a Navigation Menu in WordPress?
The navigation menu or main menu is used to display a list of links that when clicked, takes visitors to other pages on your site. These menus are most commonly displayed in the header section of the site.
The main goal of a navigation menu is to make navigation easy and seamless. Of course, the menu itself must be user-friendly and visually appealing, but if it doesn’t help visitors find what they need, then it’s probably not going to be effective.
They make it really easy to organize content into logical sections and present them in an easy-to-manage way that doesn’t look like a cluttered mess of links.
Ideal Navigation Menus make use of structured menu markup to add structure and semantics to the menu links, so when the visitor uses a screen reader they will automatically be read aloud in the correct order. Menus can also provide site search functionality, enabling visitors to quickly find content on the site.
To know more here’s a menu accessibility guide on how to create websites that meet WCAG
3 Ways to add a menu in WordPress
- Using the built-in ‘Appearance -> Menu’ option within WordPress
- Adding a Menu with WordPress Plugins
- Adding Custom Code to Your Functions File
Method 1: Using the built-in ‘Appearance -> Menu’ option within WordPress
Step 1: Creating a New WordPress Menu
One of the easiest ways to add menu in WordPress is with a built-in option. For that, you must enter the WordPress dashboard, click Appearance, then click Menus to customize your site’s default menu.
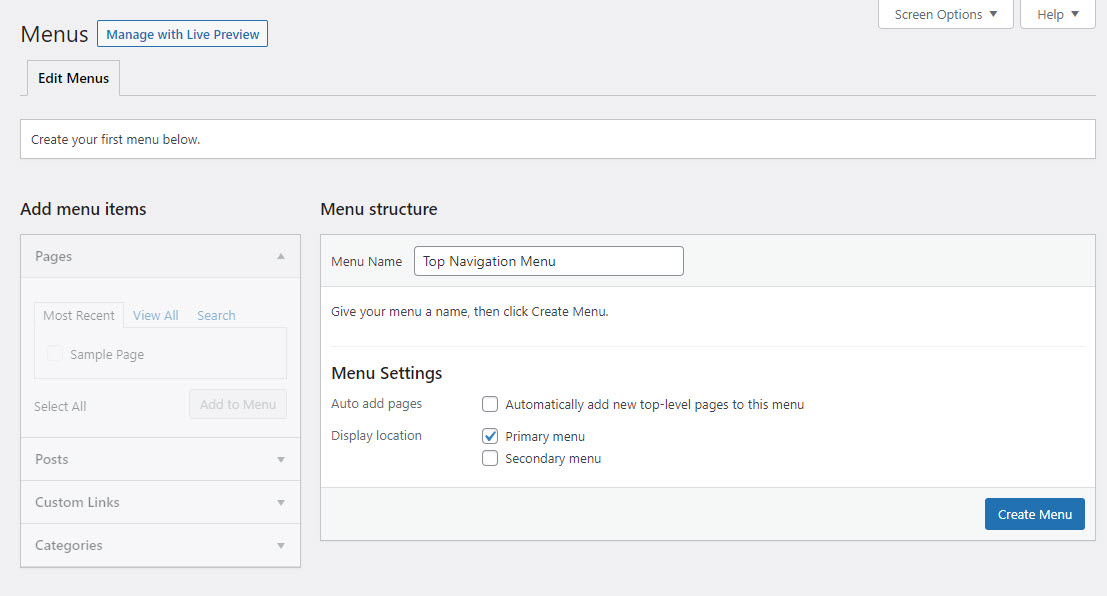
You first have to name the menu, give it any name you want I’ve named it ‘Top Navigation Menu‘ and in the Display Location option in the Menu Settings click on the Primary Menu Checkbox to make it your Primary Menu then click the Menu Create button.
You can start adding your menu items after you have created the Menu. All categories, posts, and pages of your website are collected in the left column, from which you can simply add them in just a few clicks to your custom menu.
You must first of all click Pages and View All. Choose from all pages that you want in your menu (use the checkboxes beside the names of the pages) and hit the Add to Menu Button.
Likewise, you can add Posts that you’ve published, Custom Links to any website with the URL and the Link Text, and particular post Categories to your newly created menu.
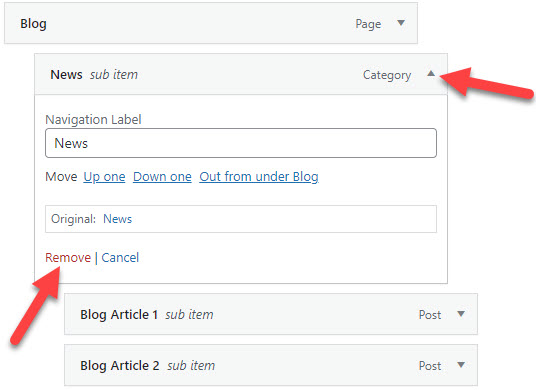
If by any means you have to delete some menu items you can click on the small downward-facing arrow positioned to the right of each item and click the Remove button to delete items from the individual menu.
The deletion process remains the same for all the items including Pages, Posts, Custom Links, and Categories.
Step 2: Arranging the Newly Added Menu Items
After you have moved the required items to the menu-items list. Now it’s time to drag and arrange each item in order of your preference.
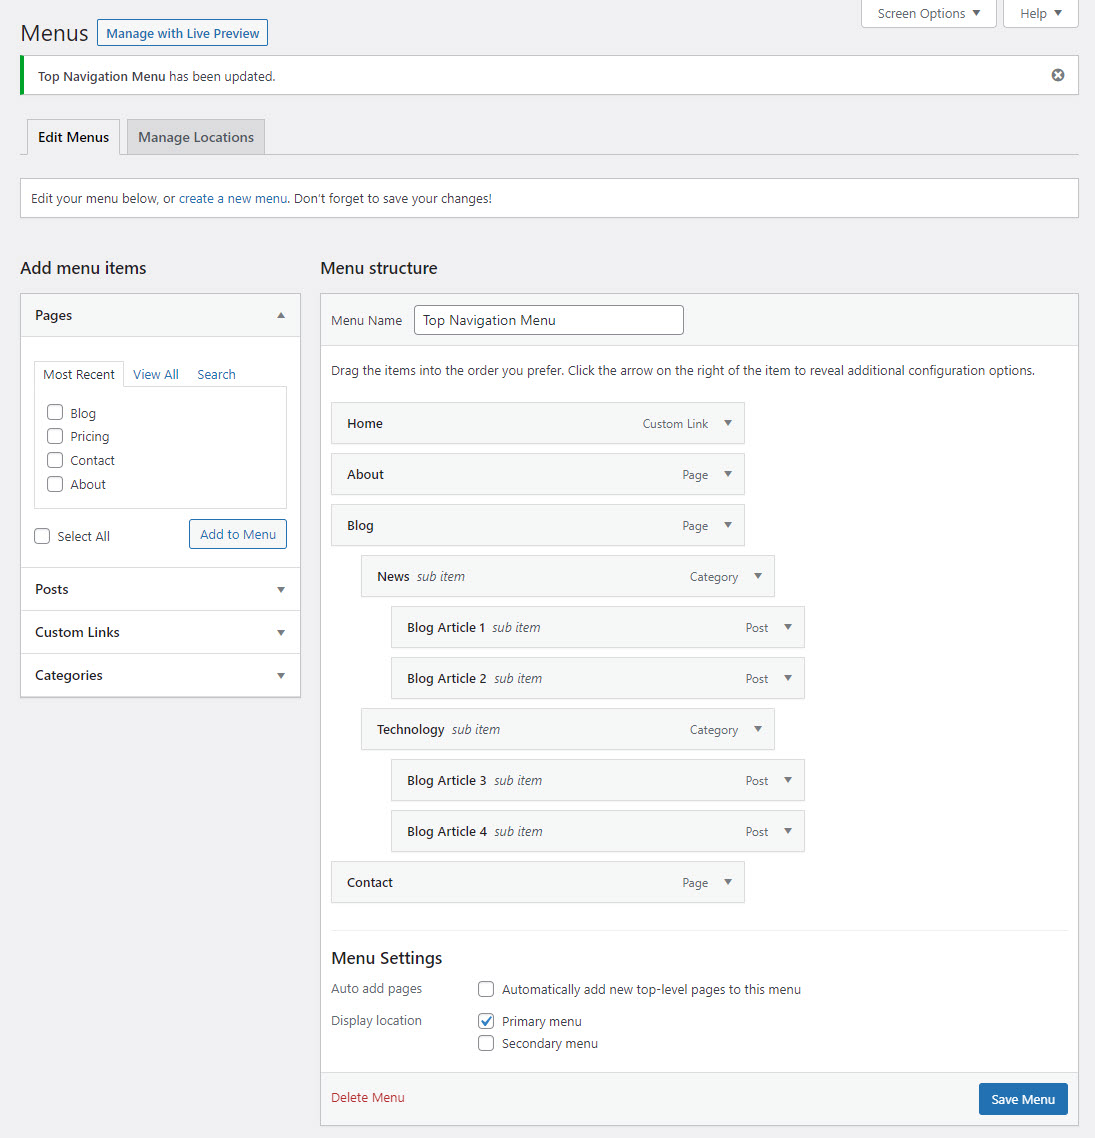
You can also create sub-menus besides the standard menus. Just drag an item from the menu to the right of another item. Submenus are going to work as WordPress dropdown menu. You simply have to drag some item to the right just below the parent item, if you want a certain item to belong to another.
The order in which you arrange the menu items over here will reflect the same on the front-end of your website. After you’ve done arranging the menu items don’t forget to hit the Save Menu button to save the changes.
Step 3: Managing Menu Locations
Now that your Custom WordPress Navigation Menu is ready, you now have to decide where it appears. We have already in the first step chosen our new menu to be the Primary Menu.
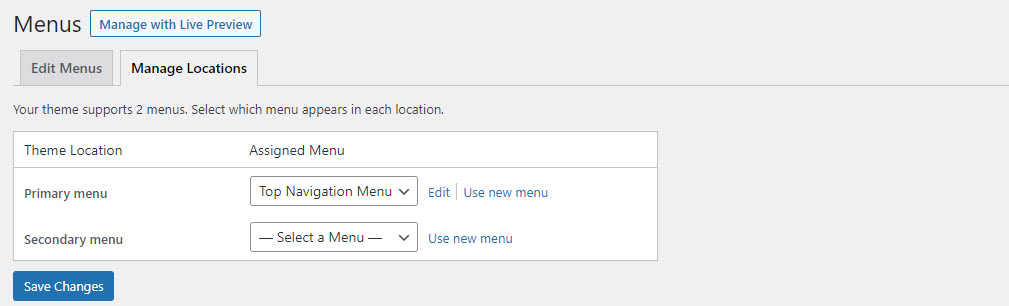
Not every WordPress theme out there supports multiple menus. Mine the ‘Twenty Twenty-One‘ theme supports only two menus the first one is Primary Menu which is the Top Navigation Menu and the Secondary Menu its location is at the website footer.
Your theme may support different theme locations (let’s say. Primary Menu and Social Links Menu). So depending on the structure of your theme designed by its developer you need to experiment and find out yourself how your menus will look and what will be their exact location once you place them.
As my theme supports only two options – Primary and Secondary – if your theme supports more theme locations you can easily manage them from the Manage Locations tab.
This is how to add menu in WordPress using the built-in menu option within WordPress.
Method 2: Adding a Menu with WordPress Plugins
The most preferred way to add menu in WordPress header is that by using WordPress Plugins. We can add a menu with WordPress Plugins like Responsive Menu, Max Mega Menu, WP mobile Menu, and many more.
For this tutorial, we will make use of the Best Responsive Menu Plugin which is available for free at wordpress.org
Responsive Menu is a highly customizable and easy-to-use WordPress menu plugin that is used by lakhs of users to beautify their website’s menu and to make it mobile responsive. The Plugin fully adheres to the W3C standards and offers a great-looking WordPress Mobile Menu within minutes.
Responsive Menu plugin offers 250+ customization options and comes with tons of features including support for WPML and Polylang plugin for multilingual websites. Also, it doesn’t require you to have coding knowledge as the responsive menu plugin is fully intuitive.
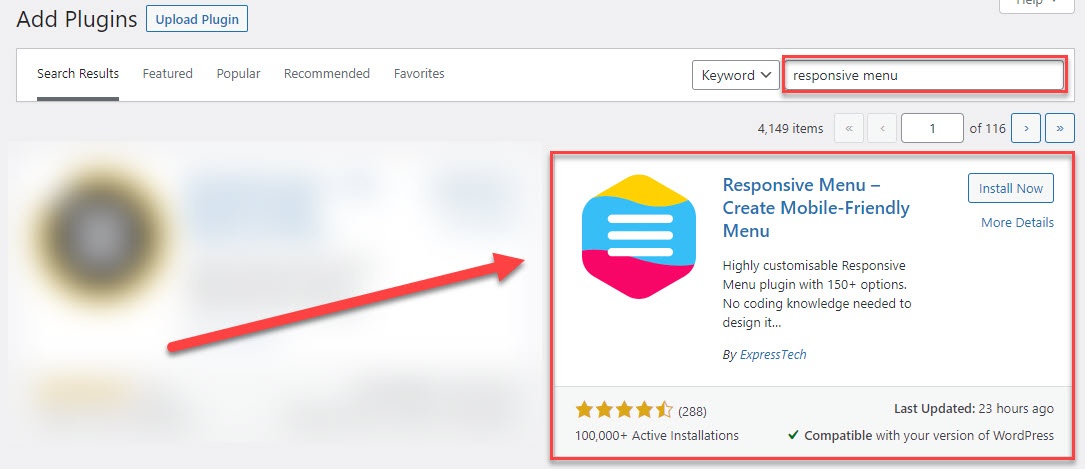
Step 1: Install the Responsive Menu Plugin
From WordPress Admin Dashboard Navigate to Plugins > Add new > Search for “Response Menu” in the plugins search to install the responsive menu plugin.
Or click the below Download Responsive Menu button to download and upload the Responsive Menu as a regular plugin.
Step 2: Creating a New Responsive Menu
A new Response Menu needs to be created. Navigate to Response Menu from your WordPress Dashboard and click Create New Menu. Choose any of the themes that come with the Plugin for free to customize them further or purchase premium themes from the Marketplace.
A new window will appear where you need to Enter the Menu Name, Choose which menu you would like to link, Hide the original theme menu to replace it with the new Mobile Responsive Menu, etc., and hit the Create Menu Button to Create the Menu by saving the changes.
Step 3: Customizing the Mobile Menu Further
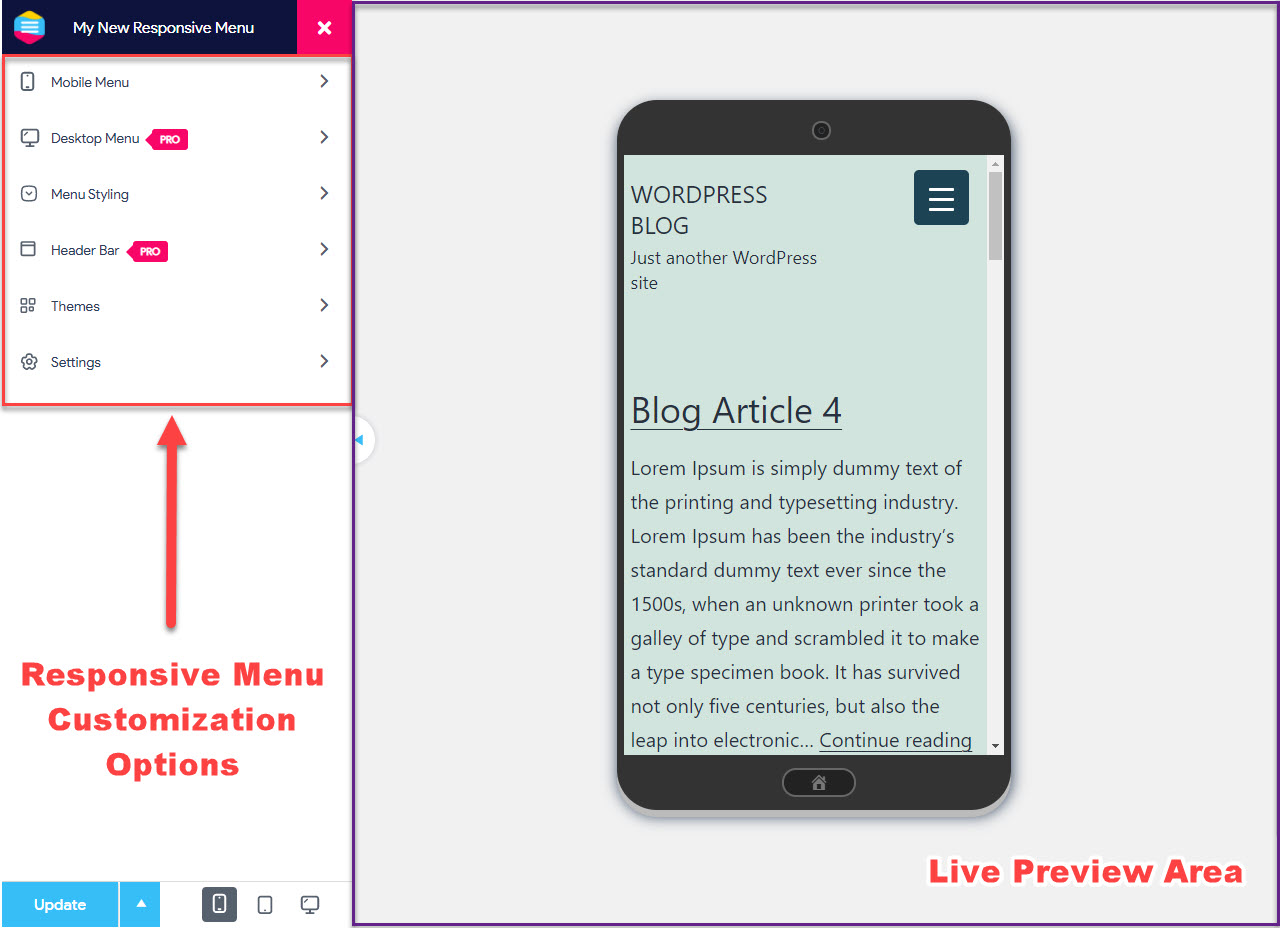
Depending on the theme you chose while creating the menu you will be presented with the live preview of your website and you can toggle the appearance from Mobile Device to Tablet and Desktop Devices.
With the Mobile Menu Customization Option, you can configure the Container Title from the default Responsive Menu text to any text of your own.
The Text Title may also be linked to a page or post and the link may also be opened on one or a different tab. You can show an image of a logo or set a font icon over the text title.
Using the Styles menu, you can choose the title Text with Padding, Font Colour, Font Size, Text Alignment, Font Family, Image Width, & Image Height.
You can configure the title and add additional content if needed inside the menu container, and style it using Padding, Font Size, Text Alignment, and Text Color, etc.
You can configure the Search box and style it as required.
You can even change the background color of the container or add a background picture. You can choose from three container animation effects in the animation section and set the direction from which you like to see the container.
The container is set up from the left by default, but the container can be modified to appear from the right using the option. With transitional delay options, you can also control the animation speed. Likewise, you can control the Menu Container Behaviour.
The Menu Toggle Button is extremely customizable with button style, button position, button type, text button, and button behavior settings. You are free to Alter the Button Style, Button Position, Button Type(Hamburger lines replaced with an icon or an image).
The Mobile Menu can be styled by adding individual menu item icons, typography, text color, background color, etc.
Here’s an article on How to Create a Hamburger Menu on a WordPress Website? that can be helpful.
Step 4: Building Mega Menu and Desktop Menu using Responsive Menu Pro
If you are just running the Base Free Responsive Menu Plugin downloaded from WordPress then these are the only features you are provided access to. However, Responsive Menu also has a Pro version which gives you full control over the Plugin unlocking all its locked features.
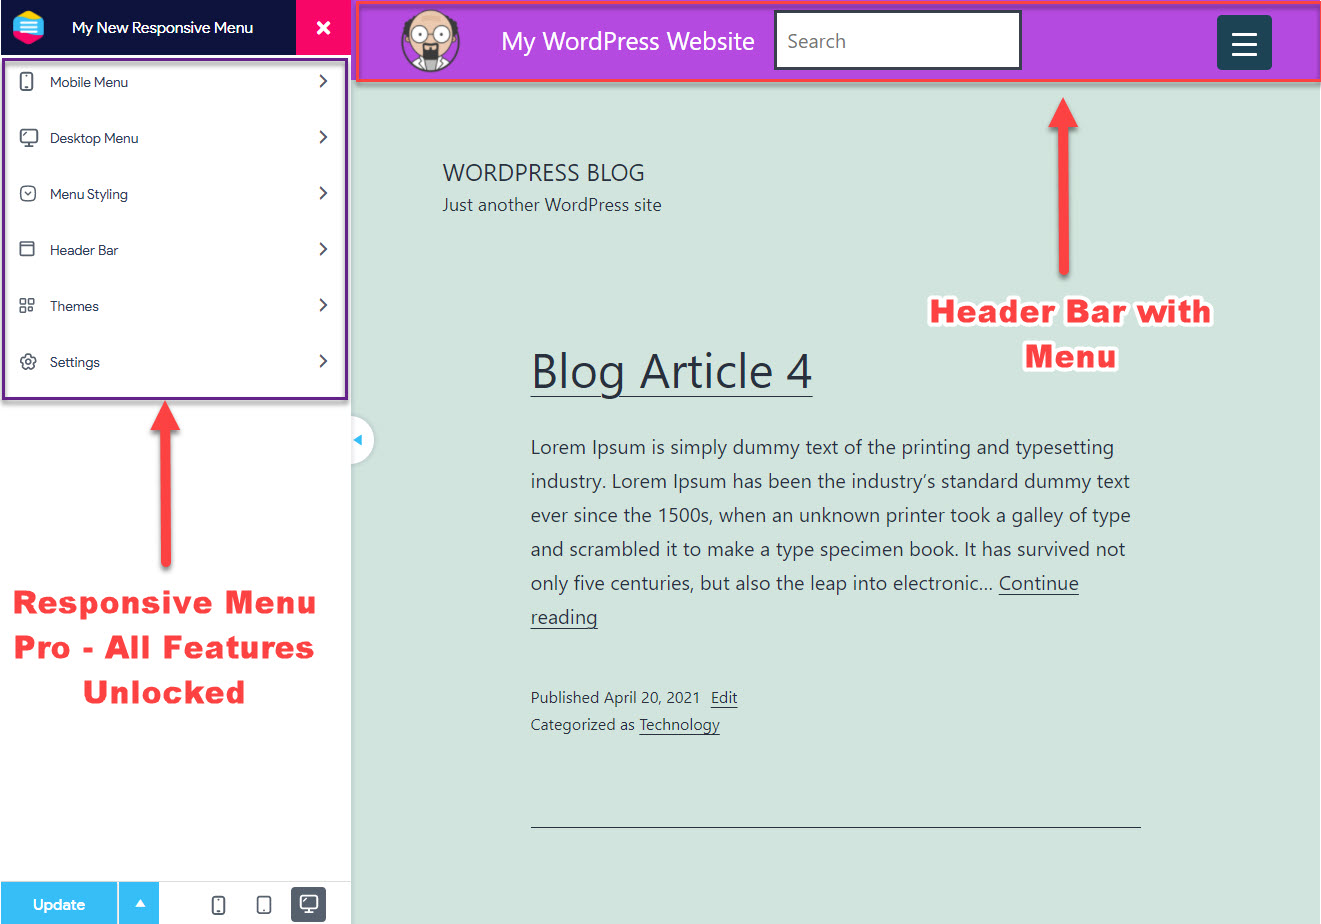
Responsive Menu Pro version unlocks Desktop Menu and Header Bar Support giving you total control over the menu appearance. The Plugin makes it super simple to add menu in WordPress header bar. These newly unlocked options pave way for extreme customizations to fully beautify your website’s menu.
Using the Desktop Menu option you can add a mega menu with an image in the menu. You can add various other items in the Mega Menu including Pages, Gallery, Audio, Video, Calendar, Archives, Recent Posts, Custom HTML, and more… not to mention the various styling you can do.
You can even enable a header bar and add things like a Logo, Header Bar Title, Custom HTML Content, Display the Menu, Add a Search bar, and style it using colors, fonts, font size, background color, and more.
Other than the Header Bar, Desktop, and Mega Menu Support, Responsive Menu pro has more premium features including Controlling the Menu with Touch Gestures and Keyboard Commands, 600+ Icons from FontAwesome and GlyphIcon support, 20+ Button Animations, Multilingual Site Support, and many more.
All these features and the fact that how easy it is to use the Responsive Menu Plugin this makes it the best way to add menu in WordPress.
Method 3: Adding Custom Code to Your Functions File
Your WordPress must be having a pre-installed theme. Or you might be running on a third-party WordPress theme. In both cases, it is possible for you to add your own custom navigation menus but given you are technically sound and capable with the said (PHP) coding language.
Add your own custom code in the Theme Functions file to customize and/or change the behavior of the theme. To add your code to functions.php go to Appearance > Theme Editor then select Theme Functions file and paste your code at the end of the editor.
You must be able to understand what the code is meant to do and act responsibly, as you fiddling around with the source files would end up breaking your website, and would anyways call for an expert developer to fix things up.
That said, it is not recommended if you are just a beginner or can’t put your website at risk with your actions. It is always better to try simple things first and later on move to the advanced part as time progresses.
Conclusion
Make your WordPress site a pleasure to visit with WordPress menus. These custom navigation menus provide an intuitive way to help your users find their way around your site.
They also make great marketing tools, as they include mouseover links on every sub-menu item. Elegant and powerful, they’re the perfect complement to your or any other blog or website created with WordPress.
Responsive Menu Plugin is the best option for making special WordPress menus, do give it a try. If you’ve read this far, it sounds like you’re ready to create one for your WordPress site.
Invest in a good WordPress menu plugin like Responsive Menu and never complain of having a bad navigation menu. Hope this article helped you to understand how to add menu in WordPress.
Liked this article? Why not share with others and help those in need ✌.